CREO Toolkit二次开发-三维布线(下)
上一篇文章已经完成了线束、线轴以及元件的操作,接下来可开始布线(Route)。Toolkit一共提供了ProCableRoutingStart、ProCableThruLocationRoute、roCableRoutingEnd、roCablelocationrefAlloc、roCablelocationrefFree五个函数用于对于布线操作。使用Toolkit进行布线操作官方文档给出解释如下,大致包括6个步骤:
To Route a Group of Cables Through a Sequence of Locations:
1.Call ProCableRoutingStart() to identify the cables to be routed.
2.Call ProCablelocationrefAlloc() to create a routing reference location structure.
3.Call ProCableThruLocationRoute() for each location through which to route the cables.
4.Call ProCablelocationrefFree() to free the location reference.
5.Call ProCableRoutingEnd() to complete the routing.
6.Call ProSolidRegenerate() to make Creo Parametric calculate the resulting cable geometry and > create the necessary cable features.
Note You must also call the function ProWindowRepaint() to see the new cables.
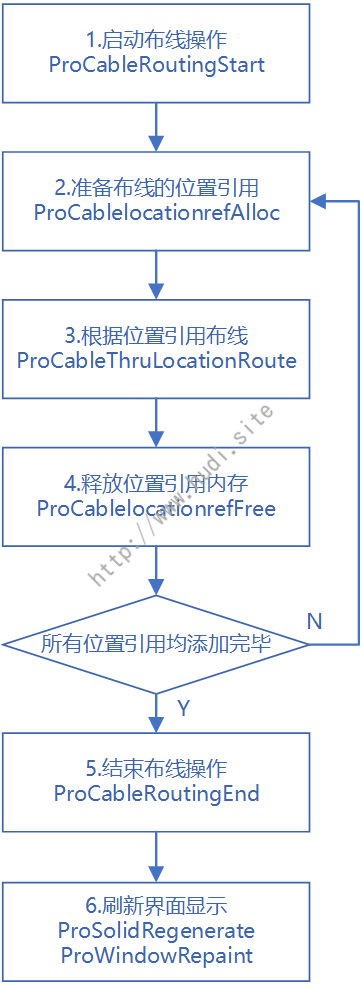
根据测试,实际操作过程中布线需要确定对应的位置和参照,而对应的位置和参照一般都会超过一个,所以上面的2-4步可以循环调用,实际代码流程图如下所示:

图 布线的流程
1.启动布线操作
调用ProCableRoutingStart函数即可开始布线。ProCableRoutingStart函数的参数有三个,第一个为装配体句柄,第二步为一个ProCable的ProArray数组,将上一篇文章中生成的ProCable结构体对象插入数组即可,第三个为ProRouting类型,作为输出用于后续的布线操作。官方给出ProCableRoutingStart的作用和使用说明如下:
After the call to ProCableRoutingStart(), the information about the routing in progress is contained in an opaque data structure ProRouting that ProCableRoutingStart() provides. This pointer is then given as an input to the functions ProCableThruLocationRoute() and ProCableRoutingEnd().
The inputs to ProCableRoutingStart() are the cabling assembly and harness handles, and an array of cables.
开始布线的示例代码如下,完成最开始所说布线6个步骤的第1个步骤:
1 | status = ProArrayAlloc(0, sizeof(ProCable), 1, (ProArray *)&array_cable); |
2.布线操作
2.1 准备布线的位置引用(location reference)
布线时需要的位置引用(location reference)在Toolkit中为ProCablelocationref对象,由ProCablelocationrefAlloc分配和初始化内存。ProCablelocationref对象的初始化需要对应的Selection对象,自动化的时候遍历装配体可以使用ProSelectionAlloc函数程序自动添加坐标系到ProSelection对象,经测试手动选择对象ProSelect函数无法在ProCableRoutingStart后使用,所以如果是手动选择获取Selection对象必须在开始布线前获取。本文为简单说明,以两个坐标系(Csys)作为布线的起点和终点,采用手动选择的方式获取,代码如下:
1 | int nSels = 0; |
ProCablelocationrefAlloc函数包含五个参数,其原型官方介绍如下:
1 |
|
第1个参数为ProCablelocationType type表示位置引用的类型,官方给出解释如下:
| type | refs | axis_flip | offsets |
|---|---|---|---|
| PROLOC_CONNECTOR | The coordinate system datum for the entry port | — | — |
| PROLOC_POINT | The datum point | — | — |
| PROLOC_AXIS | The axis | 0 or 1 to show the routing direction | -— |
| PROLOC_OFFSET | The coordinate system datum to define the offset directions | — | Offset distances from the previous location |
| PROLOC_LOC | An existing routing location | — | — |
我遇到的情况都是以坐标系(Csys)作为布线的起点和终点,所以设置为PROLOC_CONNECTOR。
第二个参数ProSelection* refs为一个Selection数组,根据函数介绍,如果是上面表格所述类型,这个数组只要包含对应的Selection即可,为简单的ProArray操作:
1 | status = ProArrayAlloc(0, sizeof(ProSelection), 1, (ProArray *)&sel_array_route); |
后面3个参数比较简单,在此不再说明,给出准备布线的位置引用(location reference)的示例代码:
1 | ProCablelocationref cablelocationref;//联接线用的数据 |
2.2 布线
有了对应的位置引用(location reference),直接调用ProCableThruLocationRoute函数即可将布线通过该位置,其参数为之前ProCableRoutingStart生成的ProRouting数据以及ProCablelocationrefAlloc生成的ProCablelocationref数据:
1 | //3.Call ProCableThruLocationRoute() for each location through which to route the cables. |
2.3 释放内存
调用ProCableThruLocationRoute之后,对应的布线参考对象cablelocationref就不再需要,使用ProCablelocationrefFree释放其内存,同时记得释放构建cablelocationref时生成sel_array_route数组的内存,代码如下:
1 | //4.Call ProCablelocationrefFree() to free the location reference. |
重复上述操作,即可确定布线的所有位置。
P.S. 使用ProConnectorDesignate可以将Selection对应的组件指定为装配连接器(assembly connector),但是测试发现不做这步也能完成布线,给出一下代码,希望有人能够帮忙解惑:
1 | status = ProSelectionAsmcomppathGet(sel_array[i], &comp_path); |
3.结束布线
结束布线只需调用ProCableRoutingEnd函数即可,其参数为之前ProCableRoutingStart生成的ProRouting数据:
1 | //5.Call ProCableRoutingEnd() to complete the routing. |
最后根据官方文档,需要调用ProSolidRegenerate和ProWindowRepaint才能显示生成的线缆。同时不要忘记在第一步中我们为array_cable申请了内存,记得释放,示例代码如下:
1 | //6.Call ProSolidRegenerate() to make Creo Parametric calculate the resulting cable geometry and create the necessary cable features. |

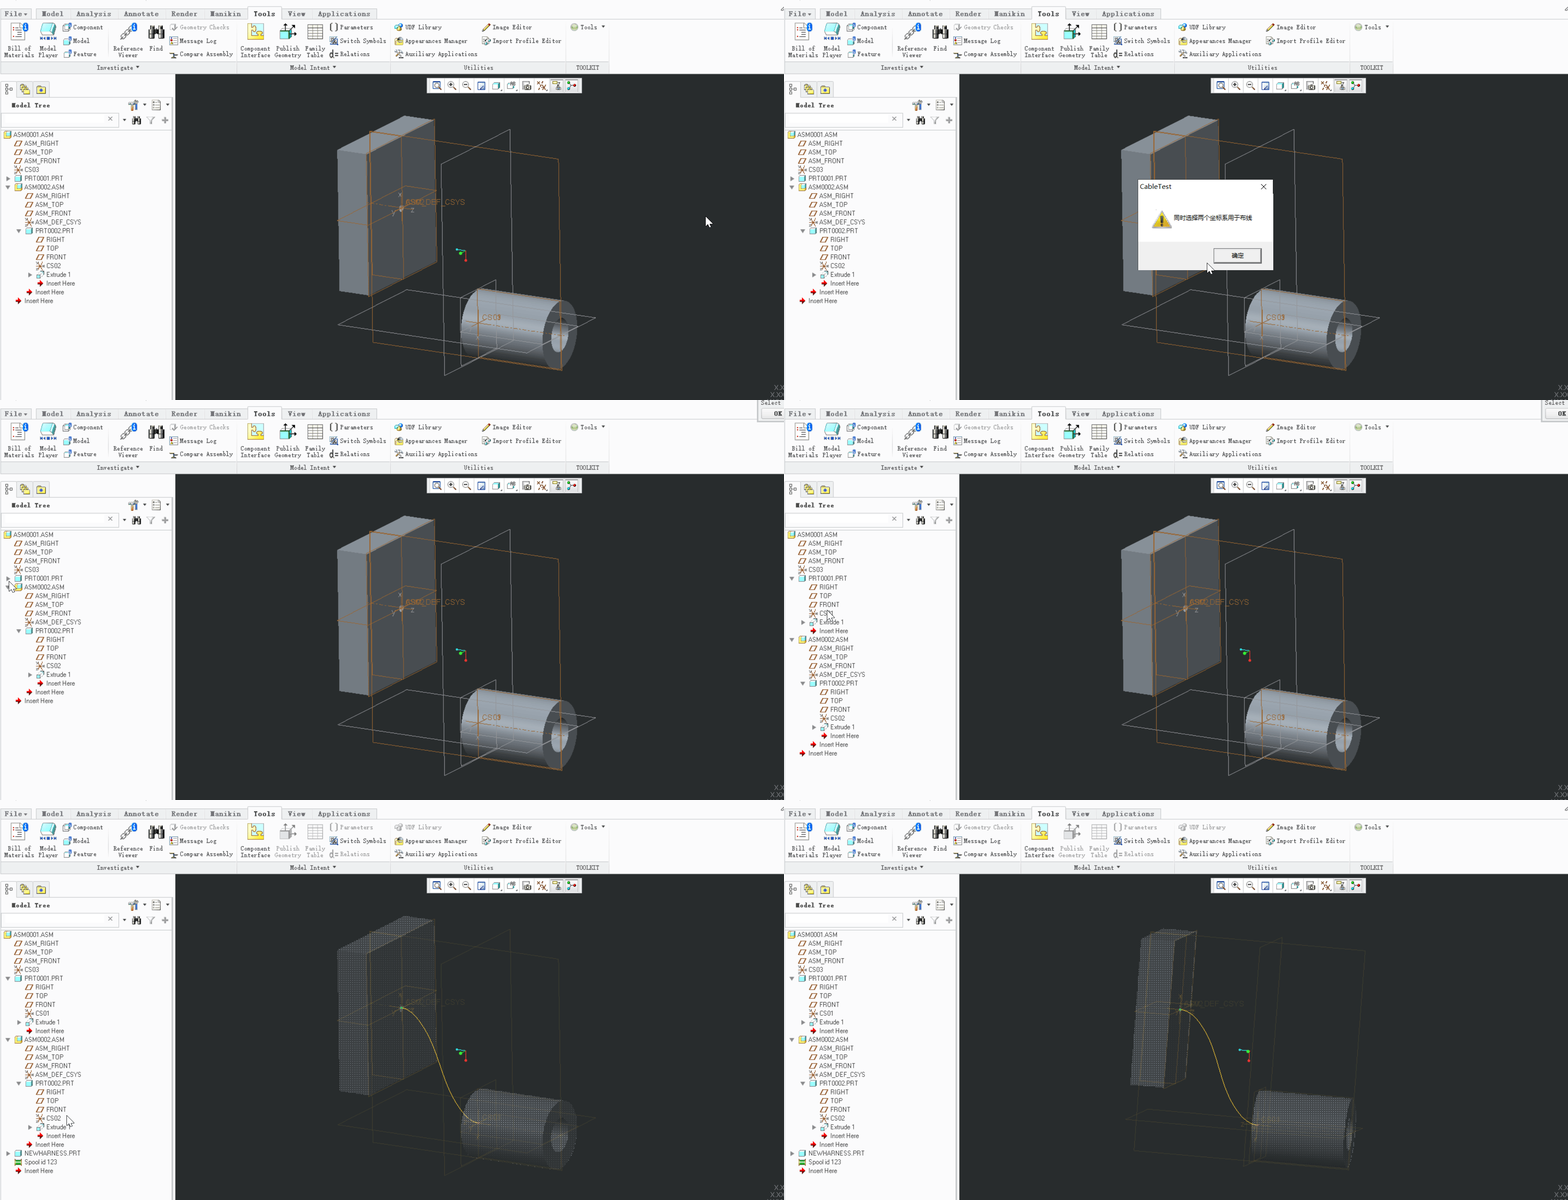
图 一键布线
完整代码可在Github.com下载。代码在VS2010,Creo 2.0 M060 X64下编译通过。