1
2
3
4
5
6
7
8
9
10
11
12
13
14
15
16
17
18
19
20
21
22
23
24
25
26
27
28
29
30
31
32
33
34
35
36
37
38
39
40
41
42
43
44
45
46
47
48
49
50
51
52
53
54
55
56
57
58
59
60
61
62
63
64
65
66
67
68
69
70
71
72
73
74
75
76
77
78
|
import win32com
from win32com import client
import VBAPI
import tkinter
from tkinter import scrolledtext, messagebox, filedialog, Tk, Button, Entry, Label
import os
CREO_APP = 'C:/PTC/Creo 2.0/Parametric/bin/parametric.exe'
PART_DIR = 'D:/mydoc/creo_python/fin.prt'
OUTPUT_DIR = 'D:/test/'
win = Tk()
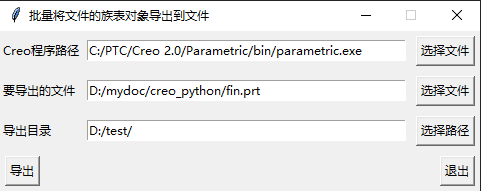
win.title("批量将文件的族表对象导出到文件")
win.resizable(0, 0)
Label(win, text="Creo程序路径").grid(row=0, column=0, sticky='W')
Label(win, text="要导出的文件").grid(row=1, column=0, sticky='W')
Label(win, text="导出目录").grid(row=2, column=0, sticky='W')
e1 = Entry(win, width="45")
e2 = Entry(win, width="45")
e3 = Entry(win, width="45")
e1.grid(row=0, column=1, padx=5, pady=5)
e2.grid(row=1, column=1, padx=5, pady=5)
e3.grid(row=2, column=1, padx=5, pady=5)
e1.insert(0, CREO_APP)
e2.insert(0, PART_DIR)
e3.insert(0, OUTPUT_DIR)
def convert():
cAC = client.Dispatch(VBAPI.CCpfcAsyncConnection)
AsyncConnection = cAC.Start(CREO_APP + ' -g:no_graphics -i:rpc_input', '')
ModelDescriptor = client.Dispatch(VBAPI.CCpfcModelDescriptor)
descmodel = ModelDescriptor.Create(getattr(VBAPI.constants, "EpfcMDL_PART"), "", None)
descmodel.Path = PART_DIR
RetrieveModelOptions = client.Dispatch(VBAPI.CCpfcRetrieveModelOptions)
options = RetrieveModelOptions.Create()
options.AskUserAboutReps = False
model = AsyncConnection.Session.RetrieveModelWithOpts(descmodel, options)
AsyncConnection.Session.ChangeDirectory(OUTPUT_DIR)
familyTableRows = model.ListRows()
for i in range(0, familyTableRows.Count):
familyTableRow = familyTableRows.Item(i)
instmodel = familyTableRow.CreateInstance()
instmodel.Copy("m_" + instmodel.InstanceName + ".prt", None)
AsyncConnection.End()
tkinter.messagebox.showinfo('提示', '文件已导出完毕')
os.startfile(OUTPUT_DIR)
def chooseapp():
filename = tkinter.filedialog.askopenfilename()
if filename != '':
CREO_APP = filename
e1.delete('0', 'end')
e1.insert(0, CREO_APP)
def choosepart():
filename = tkinter.filedialog.askopenfilename()
if filename != '':
PART_DIR = filename
e2.delete('0', 'end')
e2.insert(0, PART_DIR)
def choosedir():
dirname = tkinter.filedialog.askdirectory()
if dirname != '':
OUTPUT_DIR = dirname
e3.delete('0', 'end')
e3.insert(0, OUTPUT_DIR)
Button(win, text="选择文件", command=chooseapp).grid(row=0, column=2, padx=5, pady=5)
Button(win, text="选择文件", command=choosepart).grid(row=1, column=2, padx=5, pady=5)
Button(win, text="选择路径", command=choosedir).grid(row=2, column=2, padx=5, pady=5)
Button(win, text="导出", command=convert).grid(row=3, column=0, sticky='W', padx=5, pady=5)
Button(win, text="退出", command=win.quit).grid(row=3, column=2, sticky='E', padx=5, pady=5)
win.mainloop()
|
